EL DIENTE PEAK and MOUNT WILSON, COLORADO
 El Diente Peak  14,159"'  N/R     North Slope    Class 3
Mount Wilson   14,246'  Rank: 16th    Traverse    Class 4
Aug 28, 2019
Ascending El Diente Peak North Slopes from the Navajo Basin trailhead: PHOTOS Class 3
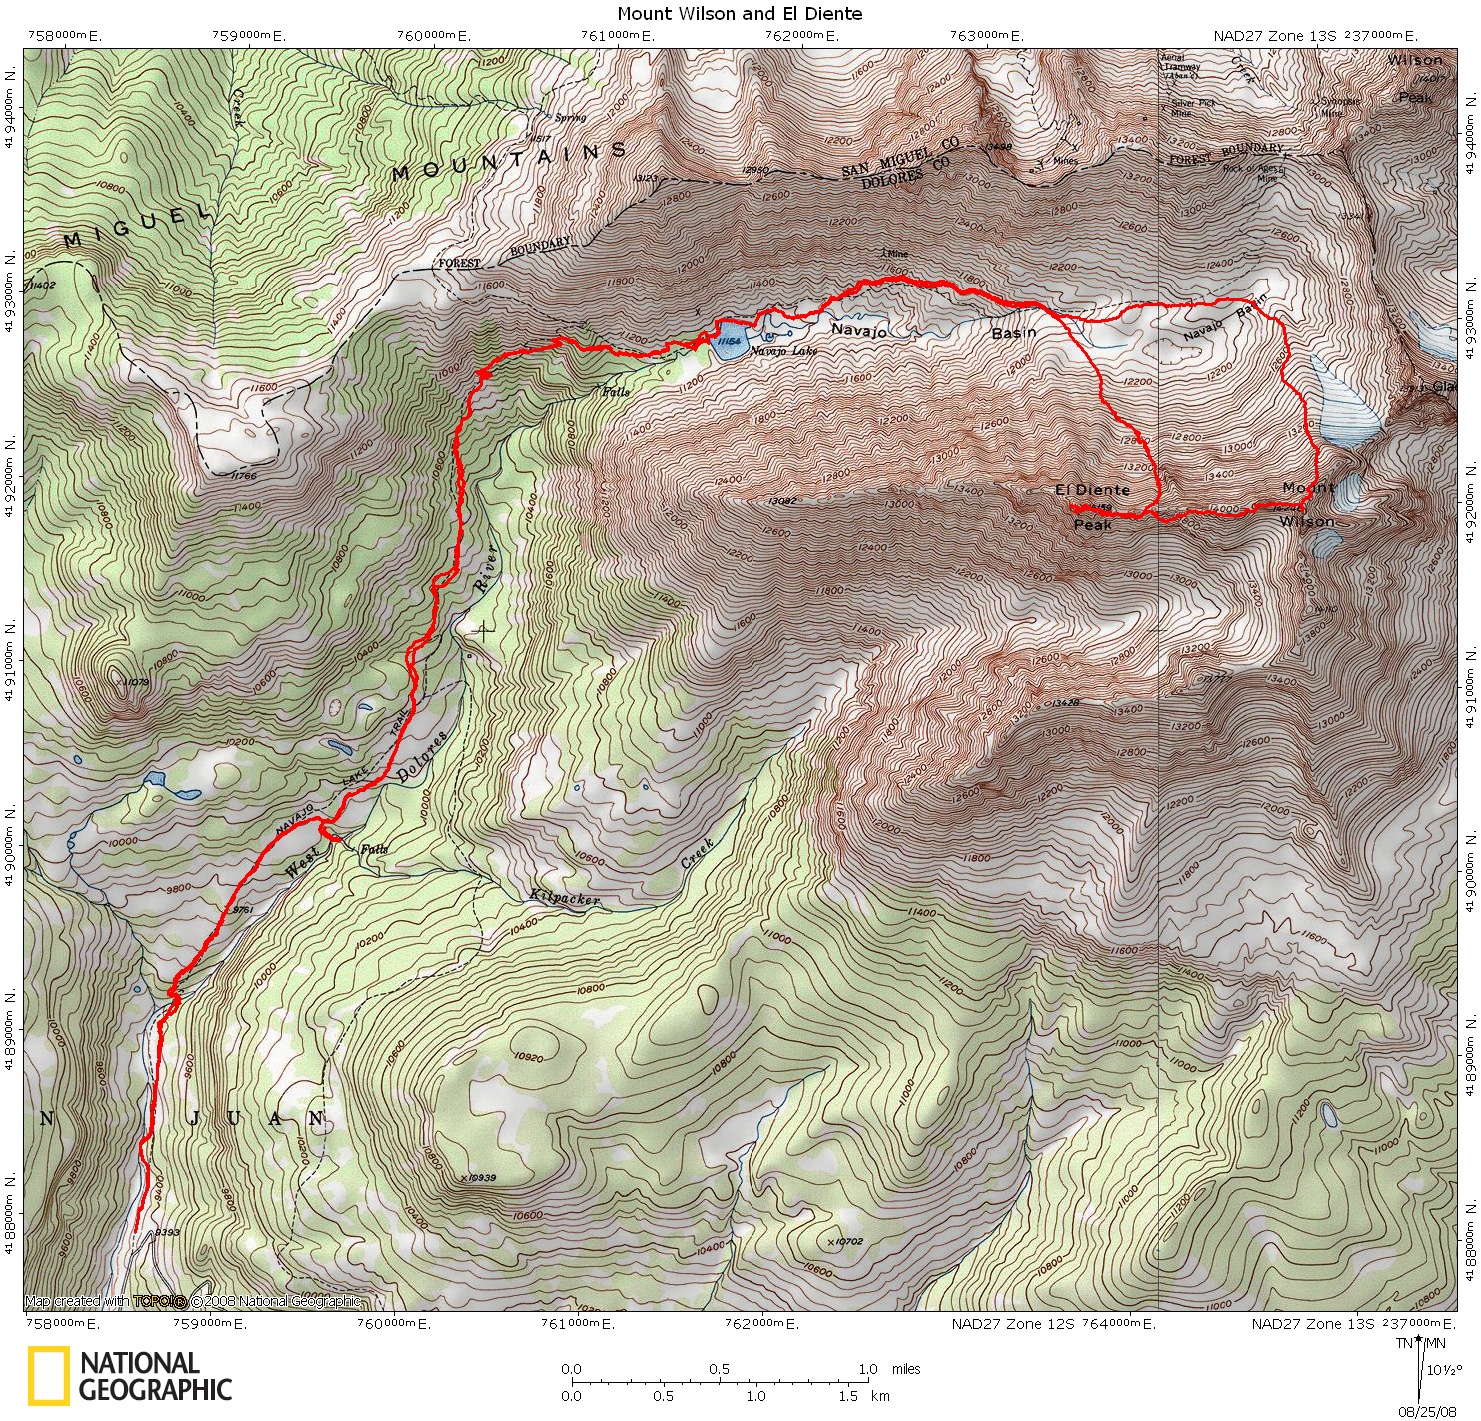
Follow the Navajo Basin Approach toward the upper (east) end of Navajo Basin. Near 12,000‘, the route is off to the right - Photo #3. Photo #1 is the view of the route from Wilson Peak. Taken near 12,100‘, Photo #4 and Photo #5 are direct views of El Diente‘s north slope route. The route up the north slope uses a long couloir which ends just below the ridge. The upper half of the couloir becomes steeper and is both safer and easier to climb with stable snow coverage. Without snow, rockfall danger is high in the couloir. From the center of the basin, hike south toward the bottom of the couloir and up on to the rock/snow apron at the base. Hike up Difficult Class 2 terrain to reach the open area below the couloir - Photo #6. Above 12,500‘, the terrain gets slightly steeper and the couloir above becomes quite obvious - Photo #7. Continue above 13,000‘ and into the defined couloir - Photo #8. Above 13,200‘, the couloir steepens to a sustained pitch where rock-fall danger is of concern. With snow, crampons are required. Keep climbing (Photo #9 and Photo #10) until you are just a couple of hundred feet below a headwall that terminates the couloir - Photo #11. Near 13,650’ and just below the headwall, turn right (west) to see a rock/snow ramp that leads to the summit ridge - Photo #12 and Photo #13. Scramble up the ramp (Photo #14), turn left and continue to a small saddle on the ridge crest - Photo #15. From the saddle, the easiest route goes around to the south side of the ridge - not along the ridge crest. Continue around the south side of the ridge on loose, gray rock (Photo #16) to reach the next section of the route - Photo #17. After crossing the gray rock, the route is about 100‘ below the ridge crest and the "Organ Pipes" (a section of tall, smooth rocks) are up to your right - Photo #18. Scramble across mostly-solid rock as you pass under the pipes. If you take the easiest way across, you will likely encounter a set of parallel rocks that almost form a chimney - Photo #19. Scramble through this area and continue toward the base of a small gully which leads back to the ridge - Photo #20. Enter the gully and ascend (Photo #21, Photo #22 and Photo #23) to a small notch on the ridge. Cross to the north side of the ridge and turn left to see the next section of the route - Photo #24. Climb onto some rocks and soon the route becomes more obvious - Photo #25. Your next task is to traverse along the side of the ridge to reach the small notch seen in Photo #26. Drop a bit and scramble over to easier terrain just below the notch - Photo #27. Climb into the notch (Photo #28) to finally see the end of the route - Photo #29. Drop a few feet into a dirt gully and scramble up to the summit - Photo #30, Photo #31 and Photo #32.
El Diente to Mount Wilson Traverse: PHOTOS Class 4
The El Diente/Mount Wilson Traverse is, according to Gerry Roach, one of the four great Colorado traverses. It is considered the easiest of the four. The other three in order of increasing difficulty are: Crestone Peak/Crestone Needle, Little Bear/Blanca and North Maroon Peak/Maroon Peak. First, follow the El Diente Peak - North Slope Route or El Diente Peak - North Buttress Route to the summit of El Diente - Photo #3. Descend back down the short gully (Photo #4) to the notch and retrace your ascent route (assuming you climbed the north slope route) back along the north side of the ridge - Photo #5. Locate the top of the small gully that drops down the south side and descend the gully - Photo #6. Without dropping too far down the slope, angle left out of the gully and begin the traverse back under the Organ Pipes - Photo #7. Cross some minor ups and downs (Photo #8) as you pass under the Pipes and return to the loose, gray rock - Photo #9. Begin your ascent back to the ridge crest by angling up and around a corner on this gray rock. After crossing the gray rock, return almost to the small saddle where El Diente‘s north slope route reaches the ridge crest - Photo #10.
Just below the saddle, stay on the south side of the ridge and hike toward a group of gendarmes that block the ridge - Photo #11. If you want to keep the difficulty at Class 3, do not climb directly over the gendarmes. Slightly below the ridge crest, cross stacked rock to reach the lower portion of the gendarmes - Photo #12. Reach the lower portion of the gendarmes and look for cairns that cross the steep rock - Photo #13. An alternative is to drop all the way below the rocks seen in these photos. This is slightly easier, but you will lose an additional 100‘ of elevation. Climb onto the more-stable, larger rocks and begin the traverse around the gendarmes - Photo #14 and Photo #15. The terrain is steep here and care must be taken to keep the difficulty at Class 3. After passing over the larger rocks, the difficulty eases and you will soon be able to the see the ridge crest beyond the gendarmes - Photo #16. The angle eases but now you must contend with more loose rock as you climb back to the ridge. Carefully climb about 200‘ back up to the ridge crest - Photo #17 and Photo #18. Back on easier terrain, but more difficulties are ahead.
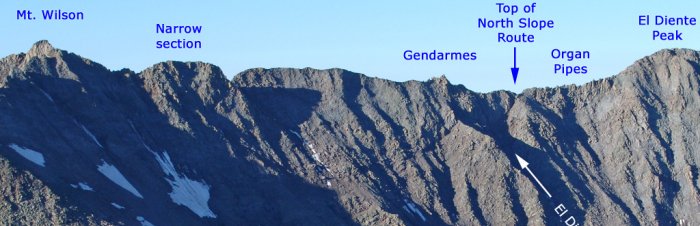
As seen in the center of Photo #1, you now get to follow a long stretch of ridge that doesn‘t pose too many difficulties. Turn right and follow the ridge crest - Photo #19. Climb above 14,000‘ and the view opens up so you can see much of the remaining route - Photo #20. Continue along the ridge to a small bump with more difficult rock - Photo #21. Drop slightly and gain the top of the bump. From this area, the next challenge comes into view - you must descend to a saddle and climb a steep section of rock to reach the last major obstacle along the ridge - Photo #22. Scramble to the end of the current section of rock and begin the steep downclimb to the saddle - Photo #23. Carefully, weave through the rocks (some are loose) to reach the low point. As you descend this area, take the time to preview the steep rock beyond the saddle - Photo #24. It can be helpful to look for lines now while you can see the entire pitch ahead. Photo #25 looks back on the descent to the saddle.
Ok, here comes the crux of the traverse - A section of rock that‘s steep on the west end, very narrow on top and steep on the east end. Drop down the right side of the ridge slightly and look for the easiest way to start up onto the rocks - Photo #26. After climbing onto the rocks, look for any section which allows you to climb up to the left, closer to the ridge crest. Continue this process until you reach the ridge crest. Note: After some exploration, I found that there are several ways to reach the top without going around too far to the right. If the climbing suddenly becomes much more difficult and exposed, try climbing back up to the left. After some exciting climbing, reach the ridge crest near 14,100‘, on the west end of this steep section of ridge - Photo #27. Photo #28 looks back along the traverse.
To see your current location along the ridge, it is labeled as "Narrow Section" on Photo #1. Scramble east (Photo #29) to the end of this section where you‘ll get a view of the remaining route - Photo #30. Next, slowly descend steep rock (Photo #31) toward a saddle before the final pitch to Mt. Wilson. Descend on or left of the ridge crest and near the base of the pitch, stay left of a rugged, yellow section of rock. Taken from the base of the yellow rocks, Photo #32 looks back at this descent. Continue east to the final saddle on the ridge - Photo #33.
Your next goal is to climb a small gully that leads to Mt. Wilson‘s summit ridge. Cross the saddle, turn right below steep rock and enter the Class 2 gully - Photo #34. Hike up through loose rock to reach a notch near 14,150‘ - Photo #35. This is where the route intersects Mt. Wilson‘s standard, northeast ridge route. From the notch, turn right, climb onto the rocks, and follow the narrow ridge toward the summit - Photo #36. Just prior to the summit, you will reach the crux of Mt. Wilson’s summit ridge - a set of rocks which block easy passage to the summit - Photo #37 and Photo #38. Climbing to the left is the easiest way around the difficult rock and climbing to the right requires an exposed, Class 4 move which may be uncomfortable for some climbers. After passing the crux, scramble a bit more along the summit ridge (Photo #39) to reach the top - Photo #40.
Mount Wilson Northeast Slope Traverse to Rock of Ages or Navajo Basin: PHOTOS Class 4 DO IN REVERSE
From
the Rock of Ages trailhead:
Follow the Silver Pick Basin Approach
to Rock of Ages saddle. On saddle, Mt.
Wilson comes into view to the south -
Photo #1 and Photo #2. Leave the saddle
and follow the trail south down to the
upper end of Navajo Basin.
From
the Navajo Basin trailhead:
Follow the Navajo Basin Approach toward
the upper east end of Navajo Basin - Photo
#3. Near 12,200‘, the end of the
basin and the turn-off to Mt. Wilson is
finally visible - Photo #4.
Near 12,300‘ and just above the stream, leave the trail and descend to the bottom of the basin to reach the base of a shoulder that stretches up to Mt. Wilson’s northeast ridge - Photo #5, Photo #6 and Photo #7. Cross the stream and begin the hike south up onto the shoulder.
The hiking is relatively easy and there are some trail segments and cairns along the way. Photo #8, and Photo #9 were taken on the lower half of the shoulder. Near 13,400‘, reach a large buttress on the shoulder - Photo #10. If the area is free of snow, you may notice that the rocks on the buttress are covered with green lichen. The easiest way to gain the buttress is to climb directly up its flat face. Reach easier terrain just above 13,500‘ and continue up the shoulder. Near 13,600‘, reach the bottom of a broad area that may hold a snowfield extending up to the northeast ridge. Photo #11 looks back on the route from this area.
The northeast ridge is above but don‘t climb to the ridge just yet. You want to angle right and make an ascending traverse over several rock ribs and possibly some snow fields. Look carefully for small cairns that lead across this rugged slope. If you climb too high, crossing the rock ribs becomes more difficult and will involve Class 3 and 4 moves. It may be very helpful to study the maps and photos before crossing this area. Photo #12 is a view of El Diente Peak during the ascent. Continue crossing the ribs and snow (seasonal) while gaining some elevation along the way - Photo #13 and Photo #14. Photo #15 was taken near 14,000‘. Near 14,100‘, intersect a long gully that runs up to the top of the northeast ridge - Photo #16. Climb the gully (Photo #17) to reach the ridge crest - Photo #18.
The remaining route involves some Class 3 scrambling and a few Class 4 moves on the summit ridge - Photo #19. Continue to up to a notch, turn left and follow the narrow ridge toward the summit - Photo #20. Just prior to the summit, you will finally reach the crux of the climb - a set of rocks which block easy passage to the summit - Photo #21 and Photo #22. Climbing to the left is the easiest way around the difficult section to the right requires an exposed Class 4 move which may be uncomfortable for some climbers. Taken beyond the crux, Photo #23 shows a climber tackling the crux head-on. After passing the crux, scramble a bit more along the summit ridge (Photo #24) to reach the summit - Photo #25 and and Photo #26.
Alternate
way to climb the summit block:
From the ridge crest at the top of the
gully, turn left and hike down about 20
feet. Turn right before a large, slanted
block (Photo #27) and walk up to the base
of the summit wall. Study the wall to
find a route which angles up to the left
and ends near a couple of pointed rocks
on the summit ridge - Photo #28 and Photo
#29. Climb to the top and turn left to
reach the summit. This variation avoids
the Class 4 crux on the top of the summit
ridge but, overall, involves more difficult
climbing.
on the Traverse with Mt. Wilson behind